

DaVinci Resolve! It’s an editing program that can be used to make all kinds of different films, including stop-motion!
We use both DaVinci Resolve and Adobe Premiere here at Barigord Studios. A couple of us got Premiere years ago, before it was a subscription, otherwise we’d probably all be using DaVinci.
If you’ve seen these programs, or seen someone using them, they might look a bit scary. And why even use them? There are plenty of stop-motion apps and programs out there, and many are pretty kid-friendly.
Why? Because your budding filmmakers can use DaVinci for all of their filmmaking needs. They can grow into it, and start learning an industry tool. And so can you, if you’re a Parent or Teacher. You might still be using it years from now, where a lot of apps come and go.
Yes, DaVinci Resolve is complicated, yes it can be scary to try and learn, and yes the interface looks like the controls of an airplane. Don’t panic. It’s free, and it’s actually pretty easy to use. Let’s get started!
*Disclaimer – This is not trying to be the best tutorial out there, and there are probably better ways to do some of this stuff, but it will get you past that first hump and into the world of editing! If you are a Parent or a Teacher, this tutorial is for you. We want your feedback, so we can make it better for you!
Prefer a video version of this tutorial? We did one! You can find it here!
PART 1 – DOWNLOAD IT AND OPEN IT UP
First, get yourself the program. You can download it here (scroll down until you find it), but if you’re skeptical about a link (not a bad idea) just type ‘Davinci Resolve free download’ into your search browser and go from there. That’s how we did it.
Just for the record, none of us are affiliated with DaVinci/Black Magic in any way, work for them, or any of that. There is an option to pay more for more features, but we haven’t done that as we haven’t needed to. It’s likely we’ll do it just because of how well the program has done for us. If you love the program or you want those features, feel free to give back.
Once DaVinci has downloaded, open it up. Choose the option to start a new project. Give it a fun name. Once you get going and make a lot of projects, they’ll start to have boring names, so get some fun ones in while you can!
The program will then open up into a complicated daunting window filled with stuff. Like this.

Yikes. Look at all that. Where do we even start? To make things worse, you might even be looking at a completely different setup. It’s been so long since that first boot-up of the program that we’re not exactly sure which page pops up first.
No matter what, look down to the bottom of the screen.

There are seven icons, each of which is a separate page of the program. All of these icons are on every page. Try clicking each of them. The one here is the ‘Cut’ page which is what defaults when we open things up.
The ones we want to focus on are ‘Media,’ ‘Edit,’ and ‘Deliver.’ Those are all you need for now. Click through them again.
We’re going to do almost everything in the ‘Edit’ page. This one here:

Soooo many things to click on. Don’t worry, we’re not using most of it. There are a huge amount of options and features, and it’s okay to ignore almost all of them right now.
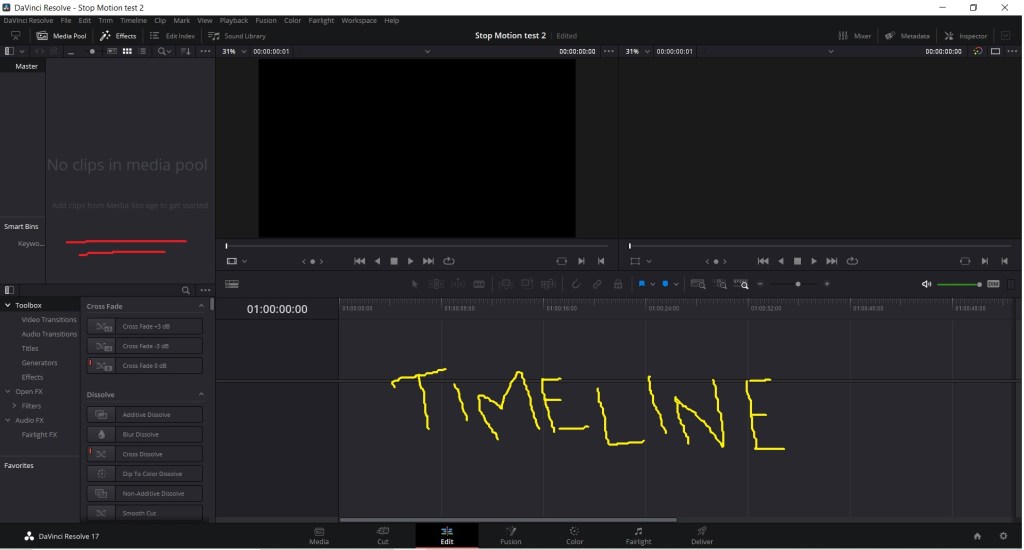
We can see the words ‘No clips in media pool.’ underlined in red. That’s the media pool. The content we use to make our videos, including pictures, video clips, and even sound files, will be in there.
We can see the Timeline, labeled in yellow, which is where we’ll be able to line up our clips to make our video. We will be taking them from the media pool.
But at the moment there’s no clip in the media pool to move into the timeline. Let’s get one! This is called Importing.
PART 2 – IMPORTING
First we need a clip. Hmmm. What’s a clip? Well it’s usually video footage, taken with a video camera of some sort.
But what we have is a few individual pictures, right? Right! And they’re actually the same.
A term you need to know right now is FPS. That means Frames Per Second. Each of the individual pictures we’ll be using for stop motion is also a Frame.
When video footage is taken, what the camera is doing is taking pictures really quickly, often at a rate of 24 FPS, or Frames Per Second. 24 pictures every second. If that sounds like a lot, it is. Take a breath, it’s okay.
Why 24 FPS? Because that’s the speed that feels like real time to our brains. Any faster and we can’t follow it as well, and any slower and it starts to feel slow and less real.
24 FPS is also a great number because it divides easily by 2, 3, 4, 6, 8, and 12. It’s easy to figure out what half or a quarter of 24 is. Even a third is easy. This is really useful when figuring out how fast you want your film clips to go. But that’s another thing for later.

Right now, what you need to know is that 24 pictures makes a second of footage.
Also, we’re going to tell you that the video we’re going to make together will be at least 5 seconds long.
5 seconds means 120 pictures.
But we’re actually going to make 5 seconds out of just a few pictures, not 120. Get out your camera. (If you don’t have a camera, now would probably be a good time to figure that out.) Cellphones work just fine!
*General Note* – keeping your camera still as much as possible while you take pictures for stop-motion is essential. It is not required for this exercise, however. Just do your best, or find the steadiest hand/tripod available. Methods to KISSS (Keep It Still for Stop-motion Success) will be covered in a separate post.
Next, take a nice picture of yours or someone’s face. Actually get 4. Get 4 different expressions with as similar a background and head position as you can. You can get more than that, but it’s best to keep this simple, and show you how you only need a few frames to do some cool stuff.
Here’s the 4 pictures that we used. You can use them if you want, or if you can’t find a camera.


We used a Lego character for this, because they’re really easy to keep still. This one was already in a rig for stop motion.

While you can use a toy for this exercise, we recommend using a human face to get some interesting and unique results. And we want you to know that a human can be used for stop motion, just like a Lego character.
Now put your photos on your computer in an easy-to-find place, like a folder on your desktop. Once they’re there, return to DaVinci and the Edit page.

Next we want to ‘Import’ our content. Importing is ‘important’ to remember because we’ll be doing a lot of it. If you want to go through the drop-down menus, here is where Import is. Top left of your screen. “File”, then choose Import, then we will be choosing Media…

We can press Control-I instead as a useful shortcut. Try it. It will open up a menu that will allow you to select a file and bring it into your media pool so you can use it. For now, just choose one of the pictures you took.

This is the menu you’ll see.

There’s our Pumpkin. Now do it again 3 more times until all 4 pictures are in your media pool. Do it one picture at a time. Don’t grab all 3 others at once yet. Yes, it’s a little awkward. We’ll explain in a moment.

There we go. 4 Pumpkinheads. Successfully imported. But we can make it easier than that.
Select the Media page from the row of icons on the bottom of the screen.

You only need to use the Media page for one thing right now: changing import settings.
Just a few moments ago, you imported 4 frames, one at a time. A few weeks ago, we imported over 1000 frames from a stop-mo shoot into DaVinci. We did this at least once a day for weeks,
We did NOT do this one frame at a time. Check out the circled area below with the arrow pointing to it.

See the button with those 3 little dots? Not so obvious, right? No kidding. Well now you know. Click on it.

A dropdown menu will appear. Hover over ‘Frame Display Mode.’
The extra little menu you get has Auto, Individual and Sequence as options. You can use Individual and Sequence for two kinds of stop-motion imports. Auto lets the program decide, and that can be troublesome. Focus on Individual and Sequence.
Individual is the kind of import we just did: a bunch of frames, maybe in order, maybe not. We plan to combine them in different ways during the editing process so we want to keep them separate for now.
Select Individual. Now go back to the Edit page, and select all 4 of your pictures in the media pool, then press delete. For real, delete them. This is just from the media pool in DaVinci, not from your computer.
Then press Control-I, and select the same 4 images again to import. This time, import them all at the same time.
We get the same result we got earlier, but with much less work. If you have 4 or 40 or 1000 random pictures to import, this is the way.
Now jump back to the Media page, and change to Sequence. Go back to the Edit page and press Control-I to import, and once again select all 4 faces and import them. What you will get is an ultra short video clip of those faces in order. It should only be 4 frames long.
Sequence automatically combines the frames into a video clip.
We’re not going to use this clip, but it’s important that you know how to import like this.
Imagine a stop motion video about a car driving along a road. The car in the picture might be just a bunch of shapes from a paint program, and looks a bit like a train caboose, but it’s going places!

The road takes us from the left side of the screen to the right. If we were doing stop motion, and this was a toy car, the pictures we would take of it to make the video will likely be in order. It’s easiest to just move the car a little at a time in the way it would go in the video, and take a picture each move.
If your pictures are already in the order you want them, you can use the Sequence import to grab all or some of those pictures at once, and turn them into a video clip. You can easily adjust the speed (or ‘Framerate’) of the clip too, so don’t worry if you import using this method and the speed is weird. One thing at a time!
Here are some notes to help understand the Sequence Import process a little better.
Sequence Import Notes
- The program uses the names of the pictures to tell if they’re in order.
- IMG_2011 comes before IMG_2012, which comes before IMG_2013, and so on. If you import those three files using Sequence, they will become a video clip in that order.
- If you instead had IMG_2012, then IMG_2014 and IMG_2015, and you imported them all at once, you would get IMG_2012 as a clip by itself, and a second video clip of IMG_2014-2015.
- Want them all as one clip? You can rename IMG_2012 to IMG_2013 if it isn’t taken, or rename all three files into something like ‘Clip01_001’, ‘Clip01_002’ and ‘Clip01_003’.
- Once you have some practice, you can even start using film names to help make importing easier and faster!
- If you have the import set to Sequence, you can still import one image at a time, like we did at the start. So if you’re doing lots of cars driving, and one or two still images of the driver, you can probably import it all without changing the setting from Sequence.
This is complicated stuff, and you’re doing great. We don’t have to do any more importing, so don’t worry about Individual and Sequence for the rest of the exercise. But you can start using these two kinds of imports on your very next project.

This is actually a really good time to take a break, stretch, maybe refresh your refreshments. We’re going to edit next, and it’s going to be great!
PART 3 – EDITING
Okay. We have this plan to make 5 seconds of footage. 120 frames at 24 FPS. We have 4 pictures to work with. We can do this.
Back to the Edit page.
*Just as a note, Control-Z is Undo. It’s really useful. It’s also okay to press the wrong button somehow and not know what you did. We’ve done it. If things get really messy, and you find you’re down some rabbit hole you don’t understand, that’s okay. Just close the program, reopen it, and make a new project. You can re-import, and it will only take a few minutes to get right back here.
This is the same Edit page picture from earlier in this post. That’s no coincidence. We’re going to double up some pictures to fill our 5 seconds.
Let’s get some clips into the timeline!
One last thing before we do is to open up the Inspector.

See the word ‘Inspector’ in the top right? It’s circled in red with an arrow pointing to it.
There’s a lot to look at with DaVinci Resolve, and the buttons and text are all pretty small. It can be tough at first, but your film needs as much space on the page as it can get, and the timeline needs a lot, too. At some point all those options will change from scary to exciting. Believe it!
Click on the word ‘Inspector.’ It will open up a panel with the words ‘Nothing to inspect’ in it.

The Inspector is a really useful set of easy-access tools that you’ll be able to dive into later. Things like zooming, changing speed, etc. to edit your clip. Keep it open for now.
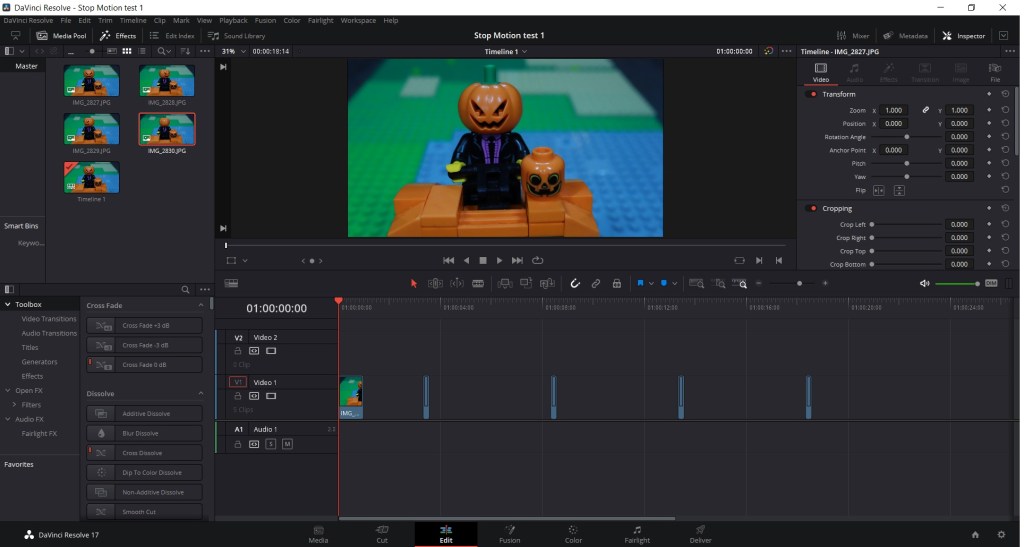
Now we can drag and drop from the media pool right into the timeline. Grab the first picture and bring it into the timeline. The main viewer, which has been blank this whole time, will fill up with an image. And the Inspector will now be full of options.

3 things are highlighted with coloured loops. Red is the Inspector. Now that we have a clip, it gives us tons of ways to play around with it! Let’s ignore them for now. They’re super useful, but we don’t need them for this exercise yet.
Yellow is the control for the size of your timeline. You can use it to get in close on your clips, or zoom out to see the big picture. Try it!
Blue is the clip we dragged into the timeline. It currently starts when the timeline starts, but it doesn’t have to. If we move it to the right, we can create a blank space before it. Like the opening of a movie where there’s some darkness before things start.
For now, keep the clip at the far left of the timeline.

Check out the red line that passes through the blue loop above. That’s where the clip will start playing from if you hit play. You can move this line around by the grabbing the red arrow at the top of the line (as marked by our yellow arrow) and dragging it with your mouse.

Play, Stop, Fastforward, Rewind, etc. are all in the red loop above. You can use them to review what you’ve got going in your timeline. Play and Stop are the main ones you’ll use right now.

Now zoom in on our timeline and get a little closer to our clip, and then click on it.
The yellow arrow shows how to move the zoom control to get closer, and the red border around our clip shows that it has been selected.
Why is it the size it is? Press Control-D. This opens up the ‘Change Clip Duration’ popup.

By default, each image you bring into the timeline as a clip becomes 5 seconds long. We can see that in the popup, and you can also see it on the timeline itself.
The automatic 5 second setting can be changed, but it doesn’t really matter that much. Especially right now. Sometimes your timeline is long, and a 5 second clip is easier to see and move around on a long timeline than one that’s only a few frames.
Before we dive deeper into Duration, let’s do one more thing with moving clips into the timeline. Click Cancel on the popup.
Sometimes when you bring a clip into the timeline, it can overlap something else, and possibly cover over some work you did. Let’s bring in another clip, after the first one, but with a gap between them.

Like this. Super easy by now, right? Look at you, editing!
Now grab a third clip and bring it into the timeline between them. Hmmm.

We have squished that rightmost clip. Actually we overlapped it. The newest clip doesn’t automatically squeeze in between and push the clip underneath to the right. It’s good to know that.
But we don’t have to put every clip into Video 1. Take that same clip, and see if you can get it into the lane above where it is, like this. Video 2 should be created automatically by moving the clip there.

Now press play. Just under the main image of our Pumpkinhead if you’ve forgotten where it is.
You should see the first image play for a few seconds, then the image in the ‘Video 2’ lane come in overtop, then the third one comes in when the second image is finished.
What does that mean? It means Video 2 is the top layer, and will cover up stuff below it.
Try moving the clips around and playing them to see what happens. Try having them all start at the same time in Video 1, 2 and 3. Which one will you see?

Layering clips can be useful for all sorts of things, including making transitions where one clip fades into another. Layering clips, effects and images can be a full-time job in the film industry, called Compositing.
For now, get yourself to the way things look below, where all 3 clips are lined up in the timeline, and clip 1 is selected. Need some help? Keep reading!

Look at the yellow arrow first. Zoom out one position to see the whole timeline better.
Then look at the blue arrows. Move the third clip right until there is enough room to drop the second clip down into the Video 1 lane.
Finally red. Select the first clip. You’re doing awesome!
Okay now press Control-D again to bring up that Change Clip Duration popup.

The popup is in red, and there are 3 things to interact with.
Format allows you to choose either number of frames or time. Duration allows you to input a specific number or amount of time. Preset gives you some common options.
Let’s try making this clip 1 second long. There are 3 ways to do it.
First, there is a 1s preset button. It’s as simple as that. Try it!
We can also go to the Duration field and change the numbers with the mouse or keyboard. Give it a try, too!
Finally, we can go to Format and change it to Frames. Like this:

This is where you can see that 1 second is equal to 24 frames and 5 seconds are equal to 120 frames. The Duration field in the popup is now in frames instead of minutes and seconds, and the presets are as well.
You might be asking if you can change the default frame-rate for the entire timeline. Yes, you sure can, but that’s not something you want to do now. 24 is a good place to be.
If you’re curious about different frame-rates, and why we use them, try this link.
By whichever method you choose, get the first clip in the timeline to be 1 second long.

We said we were making 5 seconds, and this is going to be our first second of it.
Our video is going to start with a second of stillness, so our audience can see the face before it starts moving. If we start with movement, it will be a little harder for our audience to figure out what they are looking at. Sometimes you just need a second to think ‘Oh, a face!’
Now lets do the motion. You have all the tools to do this! Lets do our second second of footage.

Get all 4 clips into the timeline behind our modified 1 second clip, like the above. A couple of them will already be there, so you’ll only have to add two. Let’s call these 4 clips a sequence.
One of them will the same as our 1 second clip. Make sure it isn’t the first clip in this sequence.
Why? Because it’s the same as our 1 second clip, and we want our movement to start right after that clip.
Now we want to select all 4. Hold the left mouse button and drag the cursor til you have them all. Then press Control-D.

Now type 6 into the field there and press Change. You should get a timeline that looks like this:
Each clip went from 120 frames (or 5 seconds) to 6 frames (or 1/4 second). We will put these 4 quarter-seconds together to make one full second!
Now we want to select the space between two of these clips and press ‘backspace.’ This will delete the gap. We could also press ‘delete’ but this will also delete our timeline above and below, including things like music. Both can be useful, but use ‘backspace’ here. You’ll get this:

See how it squishes them together. Now let’s get rid of all the spaces between all our clips, including after our 1 second clip.

We now have 2 seconds of footage. Pretty good, you. You can watch it, but it might be more fun to follow the last few steps before you do.
Next, move the red line to the end of the clips, then select the four clips you just made 6 frames each. Like so:

Now press Control-C to copy these clips, and Control-V to paste them onto the end of the time (where the red line is). Like this:

Alright, now we’re going to press Control-D again and change the duration to 4 Frames Per Second (FPS), then get rid of the spaces between the clips, like this:

This is a good time to zoom in on the timeline to make it easier to work with.

Much easier. Hey look, we have almost 3 seconds now.
We’re going to copy those same 4 clips again 3 times, and change the FPS to 3, 2 and 1, then get rid of the spaces between them.
Then we should have a timeline that looks like this:

You can do that, right? We know you can!
So we’re almost at 4 seconds, aiming for 5, but we’re going to go past that and add a couple of tricks.
You’re ready.
Select all the clips, then copy them and paste them onto the end, so you’ve got the same sequence of clips twice. The second sequence should still be selected. Like this (we also zoomed out on the timeline):

Now right click, bringing up a menu filled with options. You only need the one at the top. It’s ‘New Compound Clip’. Click on it.
You will now be able to name the new clip. Then click Create.

This turns your clip sequence into a single clip.

Make sure you’re happy with the clip sequence before doing this, just because it’s easier to make changes when it’s broken up into smaller pieces.
Now select your compound clip.
Go up to the Inspector and scroll down until you see ‘Speed Change.’ Click on it to open up the options.

You’ll see options similar to what’s in the Control-D popup. They are! You can also change Duration here, with handy options.
Click on the little arrow next to the highlighted arrow in the yellow loop. This will reverse the direction of the clip.
By doing this, we will have a short sequence that plays forwards, then plays backwards. Since it will start and stop with the same frames, it can also be looped. . It’s closer to 8 seconds than 5, you overachiever! Well done! We’re almost there.
Speed Change Notes
- You can change speed and frame rate using the Inspector.
- The length of the clip and the speed of the clip are different.
- You can’t change speed on a clip that’s a still image, even if it’s 5 seconds long. If the image doesn’t change, there is no need for speed. But you can still decide how many frames long it is.
- If you change the length of a clip, and there is movement in the clip, the speed will change also.
- If you change the frame-rate of a clip, it doesn’t automatically change the length of the clip. You may have to manually extend it by dragging the end of it with your mouse.
- Try clicking the ‘Ripple Timeline’ box before changing the speed or number of frames in a clip. It can do things like automatically getting rid of those spaces between clips we had to backspace before. But it uses delete, not backspace, so be aware!
PART 4 – RENDERING AND DELIVERING
We now have a sequence that we can render and deliver.
Rendering turns our timeline into a video file.
Delivering means putting it into a folder on your computer where you can do further stuff with it, like post it online.
You can press Control-S to save, though there is a an autosave feature if the program is closed.
If you want to stay and play with the timeline, please do! Try the Inspector out. You’ve unlocked a super-cool sandbox. Well done!
For those ready to export their work, let’s jump over to the Deliver page, from the Icons at the bottom of the screen.

The Deliver icon is in the red here. You’ve probably been to this page by now.
Next we want to press ‘Browse.’ It’s up in yellow in the upper left.
This will allow us to name the file and choose where it will appear when it’s ready. You can name it before pressing Browse in the field above it, but it’s the same result.
Avoid naming your file anything too close to any of the files that you’ve used to make it. There can be problems.
In the blue loop above is the Format menu, which is handy to know about because sites like Youtube, Tiktok, Instagram etc. prefer specific types of files. MP4 is a solid choice.
There are other Settings options, but you can explore those later. We’re ready to click Add to Render Queue.

Just to review: in the red loop above is our named file. Your Location won’t be blacked out, like ours. That’s just for our privacy.
Our chosen file format is MP4, in the yellow loop.
Add to Render Queue is in the blue loop. You’re ready to click it!
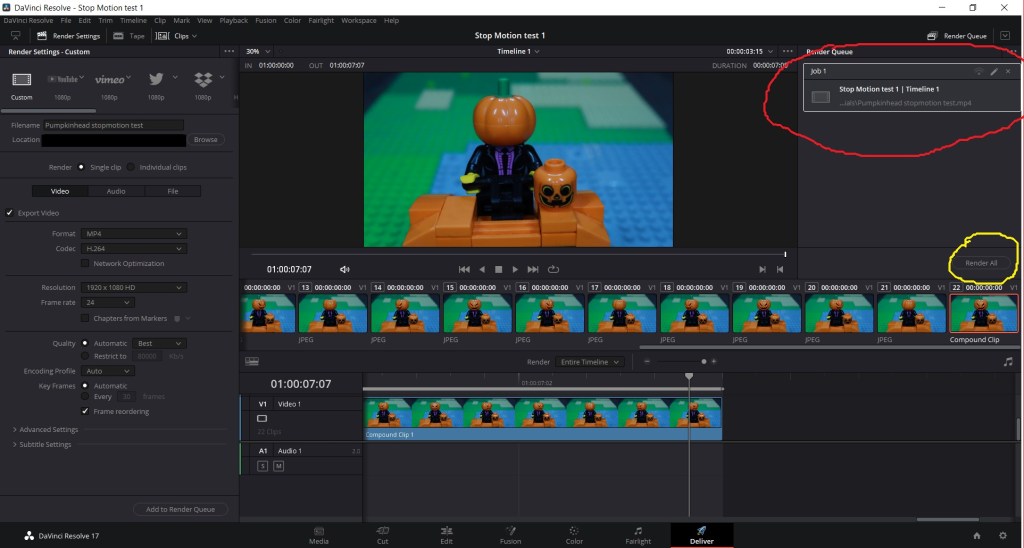
A ‘job’ will appear, like in the red loop above.
We are ready to ‘Render All.’ In the yellow loop.
If you change pages, or go back and make another change to the timeline, the Render might fail. You might need to refresh the Location and Filename by clicking on Browse and then pressing enter to reconfirm the same name.

Successful render! Here’s the little pumpkinhead film we made!
With Jacquie Jolly here, our film makes it look like her head is spinning around. If you used pictures of yourself or another person, you’ve likely got something quite different.
There’s no pressure to share the video you made. It might be weird, or really wobbly, or something unexpected and strange. This was about getting your feet wet.
But who knows, maybe you’ve got something really great here. We hope you can see how this process can help you create a proper stop-motion video!
REVIEW
So let’s review here. You can import your files as clips in a couple of useful ways, and you can move them around, change how long they are, reverse them, etc. That’s a great start. Congratulations!
Now go back and take those pictures to the timeline and do something completely different. Change the order of the clips, change the speed, and check out some of the other options in there. See if you can tell a story with just those 4 pictures, or try a set of different ones.
You’re editing!
Try creating a new project and importing the video you made into it. Don’t import a video into the same timeline it came from. It causes problems.
Then edit your clip! Check out what the Inspector can do to it. Experiment! You can always undo your mistakes, or start over with a new project.
You’re on your way!
Here are 2 final tools that are worth highlighting because you might use them a lot:

In the red loops are a couple of little white tabs that appear when you hover over the clip, or have it selected. These are easy fade-in/fade out controls. They can be dragged with a mouse. Try them out to see how they work.
In the yellow loop is a little Razor Blade icon. This is for chopping up your clips. It’s a good idea to zoom in as close as you can when making a cut. Try it out!
When the Razor Blade is selected, your normal ability to grab and move clips with your cursor won’t work, so get used to changing back and forth.

You can also grab the edge of your clip with your mouse, and change the length of it. With a still image, like our cute monkey friend here, we can easily make it as long or short as we want. This was briefly mentioned earlier in Speed Change Notes.
With a clip that involves motion, things are a little different. Try it out and see how it works.
Finally, your web-browser is possibly your most useful tool. We often ask it things like ‘How do I make a credit crawl sequence in DaVinci Resolve?’ There are dozens of advanced and specific tutorials out there that should now make a lot more sense.
WRAP UP AND LINKS
This concludes the tutorial. Your next step is to go out and get some footage and see what you can do with it.
Want a couple of easy exercises to get you going?
Try: Let’s Go For a Roll – A simple exercise that families or classrooms can do to get their feet wet with many stop-motion basics. Minimal requirements, big payoff.
Try: 4-Frame Dance Off – Coming Soon! Click the link for an example.
Want some tips and tricks to make your life easier during your stop-motion filming process? Try:
Want some useful story techniques that help you get around tough motions to make, like walking? Try:
Very thorough, thank you for sharing your process. 😀
Thanks! Stop motion is accessible filmmaking for almost all ages. We hope to help spread the skill far and wide!
awesome stuff got some inspiration